As a seasoned WordPress speed optimization expert, I’ve seen firsthand how crucial website performance is for—search engine rankings, user satisfaction and conversion rates. I’m in a perfect position to share an expert WP Rocket Review.
At WPservice.pro, we’ve earned recognition as one of the top three WordPress speed optimization agencies worldwide, and WP Rocket have played a pivotal role in our success, this prompted me to write WP Rocket Review in a first place.
Please be aware that however powerful WP Rocket is, on some websites it can be complicated to master. You need to know how to use it properly, and that’s why I decided to write this WP Rocket Review/case study.
Table of Contents
- The Before and After: Speed Transformation with WP Rocket—case study
- 1.1 File Optimization: Streamlining CSS and JavaScript for Peak Performance
- 1.2 File Optimization part 2: JavaScript Optimization
- 2. Media Optimization: Lazy Loading and Image Enhancements in WP Rocket
- 3. Preload in WP Rocket: Accelerating Content Delivery for Improved Performance
- 4. Advanced Rules: Fine-Tuning Cache Behavior for Precision Control
- 5. Database Optimization: Reducing Bloat for Faster Performance
- 6. Cloudflare Integration: Enhancing Caching and Security
- 7. Heartbeat Control: Optimizing Server Resource Usage within WP Rocket
- 8. Add-ons: Extending WP Rocket’s Functionality for Specialized Needs
- 9. Tools: Simplifying Management and Troubleshooting
- Conclusion: WP Rocket – Your Shortcut to a Faster Website
- FAQ
A few words about this WP Rocket Review and the case study setup
In this case study I tested this website—WPservice.pro. Our website is already fully optimized for speed. It uses Cloudflare CDN, a solid web host server, a lightweight GeneratePress theme, and a GenerateBlocks page builder. In short, it was built with speed in mind.
Other, more complicated, heavy websites with bloated themes/page builders may experience even more drastic changes in before-and-after speed test results, for them, this WP Rocket Review is even more important.
For this WP Rocket Review, I did the tests in reverse order (as our website is already optimized for speed). So first came the server TTFB tests via the KeyCDN tool, followed by the Google PSI test with the WP Rocket operational, and then I repeated the tests after I deactivated the WP Rocket (and cleared the CDN cache).
Yes, I’m aware that in this WP Rocket review, I could have used the ‘nowprocket’ URL suffix, but I decided against it for these tests. The test order is unimportant for the WP Rocket review, only the results are.
So, this was NOT an unoptimized (for speed) website vs. an optimized one, but the fully optimized website with and without WP Rocket. A CDN, and all the other settings remained, and stayed operational all the time during this case study.
The Before and After: Speed Transformation with WP Rocket—case study
For the WP Rocket review, one of the biggest challenges in speeding up websites is addressing slow server response times, often measured by Time to First Byte (TTFB). TTFB indicates how quickly a server responds to a browser request, and improving it directly enhances how users perceive your site’s speed.
When paired with a robust caching system like WP Rocket, it becomes possible to reduce TTFB significantly and optimize other performance metrics such as the PageSpeed Insights (PSI) score.
TTFB Test Results: The Global Impact of WP Rocket
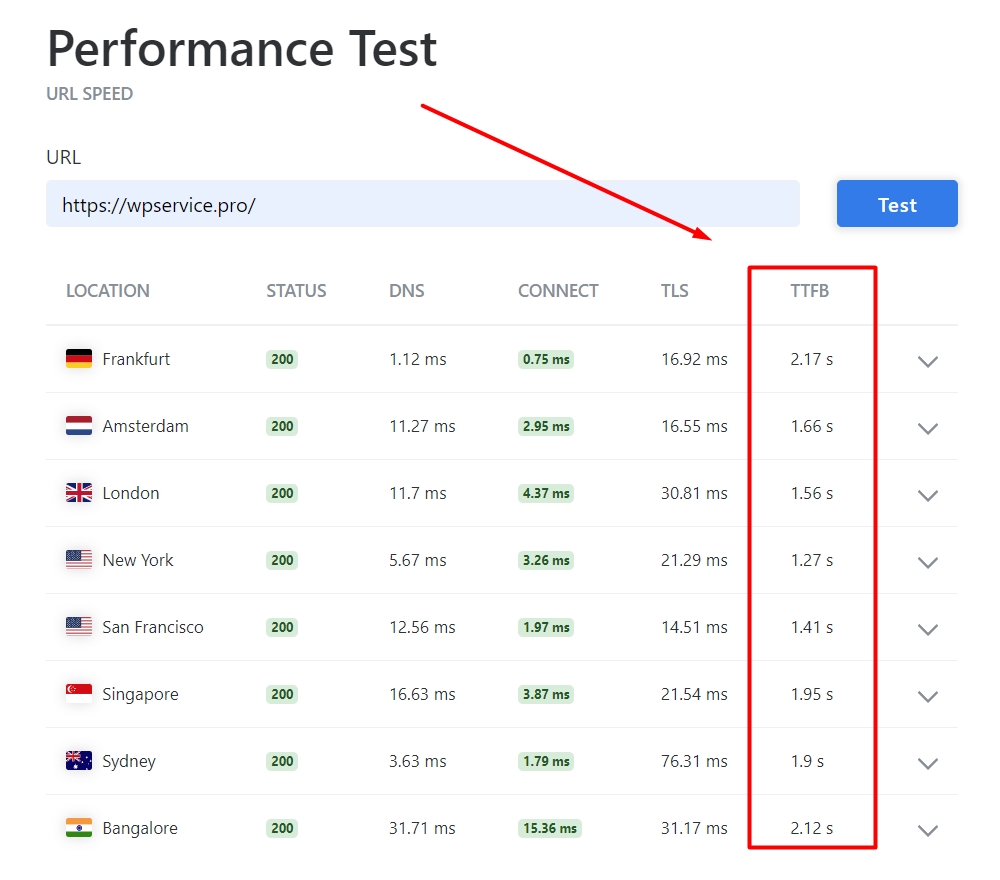
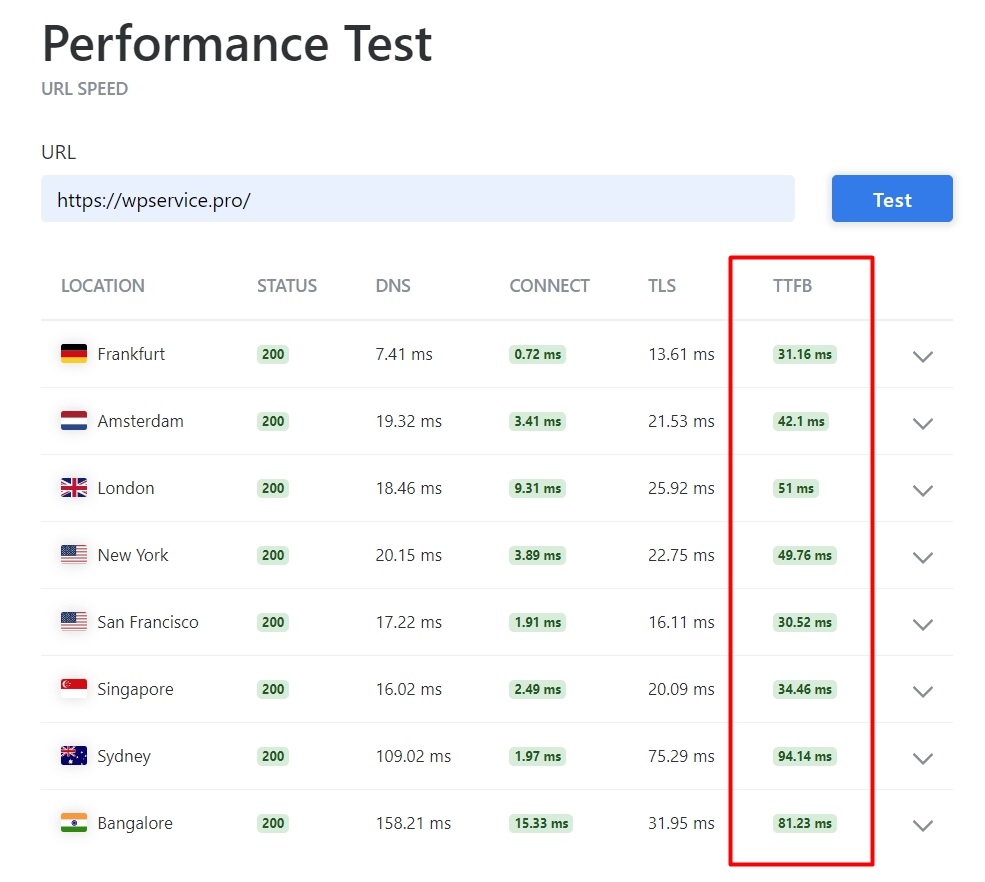
For the server performance TTFB test in the WP Rocket review, I used the Performance test from KeyCDN.
TTFB is heavily influenced by the holy trinity of speed: the web host server, a CDN, and a page caching plugin like WP Rocket. To achieve stellar, under 100 ms, global results, you need to have all three in top shape.
For the novice among you, less is better in speed tests.
Without WP Rocket (the first image), TTFB tests showed sluggish server response times across various global locations. Frankfurt clocked in at 2.17 seconds, while locations like Amsterdam and Bangalore had times exceeding 2 seconds.
Such delays indicate inefficiencies in server response that impact overall loading times, especially for international users.
The difference was dramatic after activating WP Rocket (the second image) in this WP Rocket review. Frankfurt’s TTFB dropped to an impressive 31ms, and other locations like New York, London, and Sydney followed suit, all showing excellent response times under 100ms.
This improvement demonstrates how WP Rocket reduces server workload and improves caching, ensuring faster data delivery to users, regardless of their location.
Naturally, without working CDN, these test scores would be even worse for the locations further away from the web host server location.
Case study PSI Test Results: User-Focused Speed Optimization
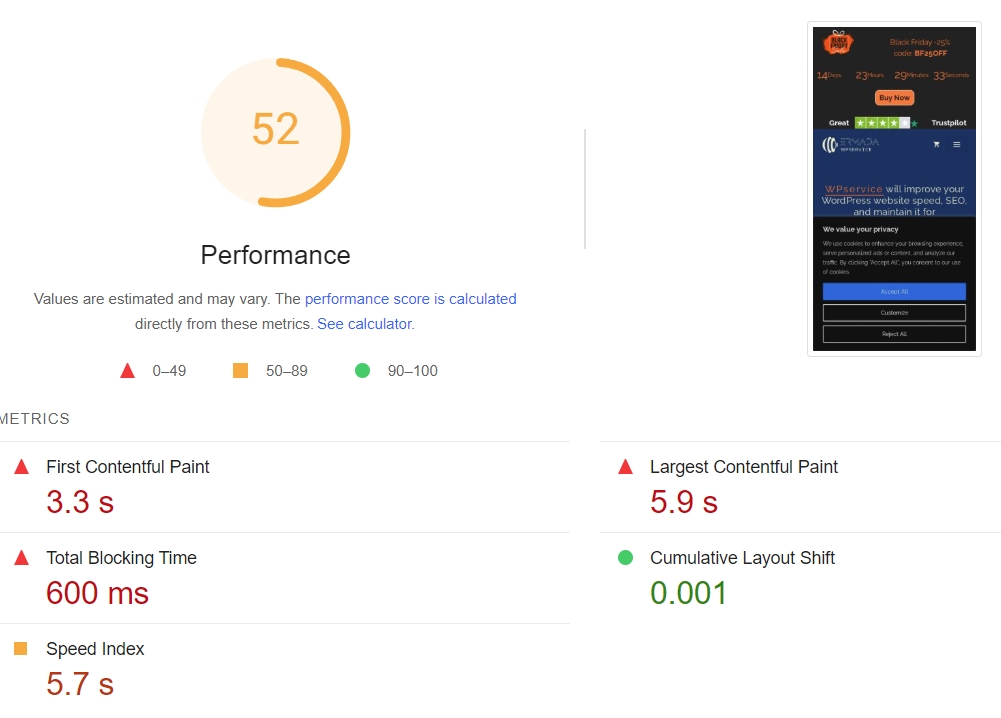
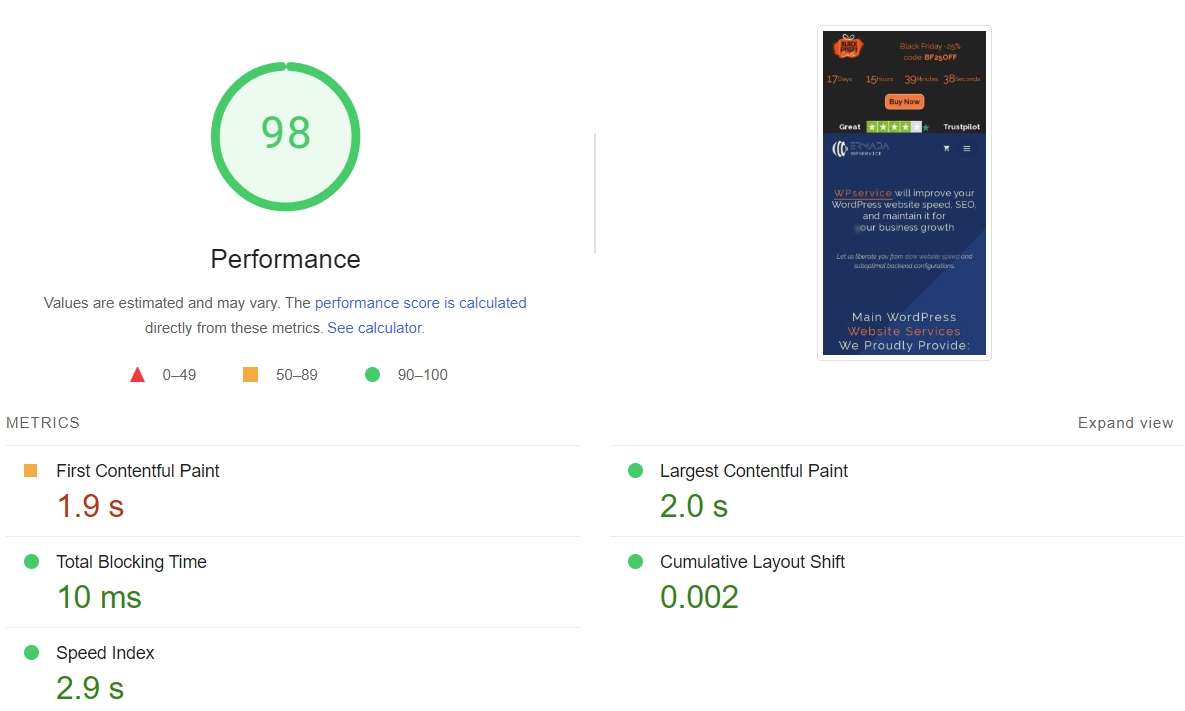
For the second speed test, I used Google’s PSI test (its mobile version, which is usually harder to improve). Sure, it’s not the most reliable testing tool, but most of our clients love it (I can’t say how many times the speed optimization project involved 90+ on the mobile PSI test as one of its goals).
So, by popular vote here it is.
The PSI tests without WP Rocket painted a similar picture of underperformance. A Performance Score of 52 revealed slow loading times, with metrics like First Contentful Paint (FCP) at 3.3 seconds and Largest Contentful Paint (LCP) at 5.9 seconds.
Let this WP Rocket review reveal that these values indicate a frustrating user experience, especially for mobile users who rely on quick page loads.
Activating WP Rocket propelled the PSI Performance Score to 98, with dramatic improvements across the board. FCP dropped to 1.9 seconds, and LCP improved to 2.0 seconds, providing a smoother and faster experience.
Total Blocking Time (TBT) was reduced to just 10ms, ensuring the site responded instantly to user interactions.
If it’s only due to page caching, any free plugin can help you solve that problem, but WP Rocket offers much more. But more on that in the next section of this WP Rocket review.
“From our side, we say thank you to WPservice Pro for successfully using WP Rocket on speed optimization projects! 🚀
WP Rocket
Are you inspired by WPservice Pro’s experience and ready to optimize your clients’ websites and scale your projects while saving time and effort?”
WP Rocket Features and Settings – the details
After acquiring WP Rocket and downloading your installation file from your account, you can install it in WordPress via the Add new plugin/upload plugin.
Than you can access your WP Rocket dashboard.
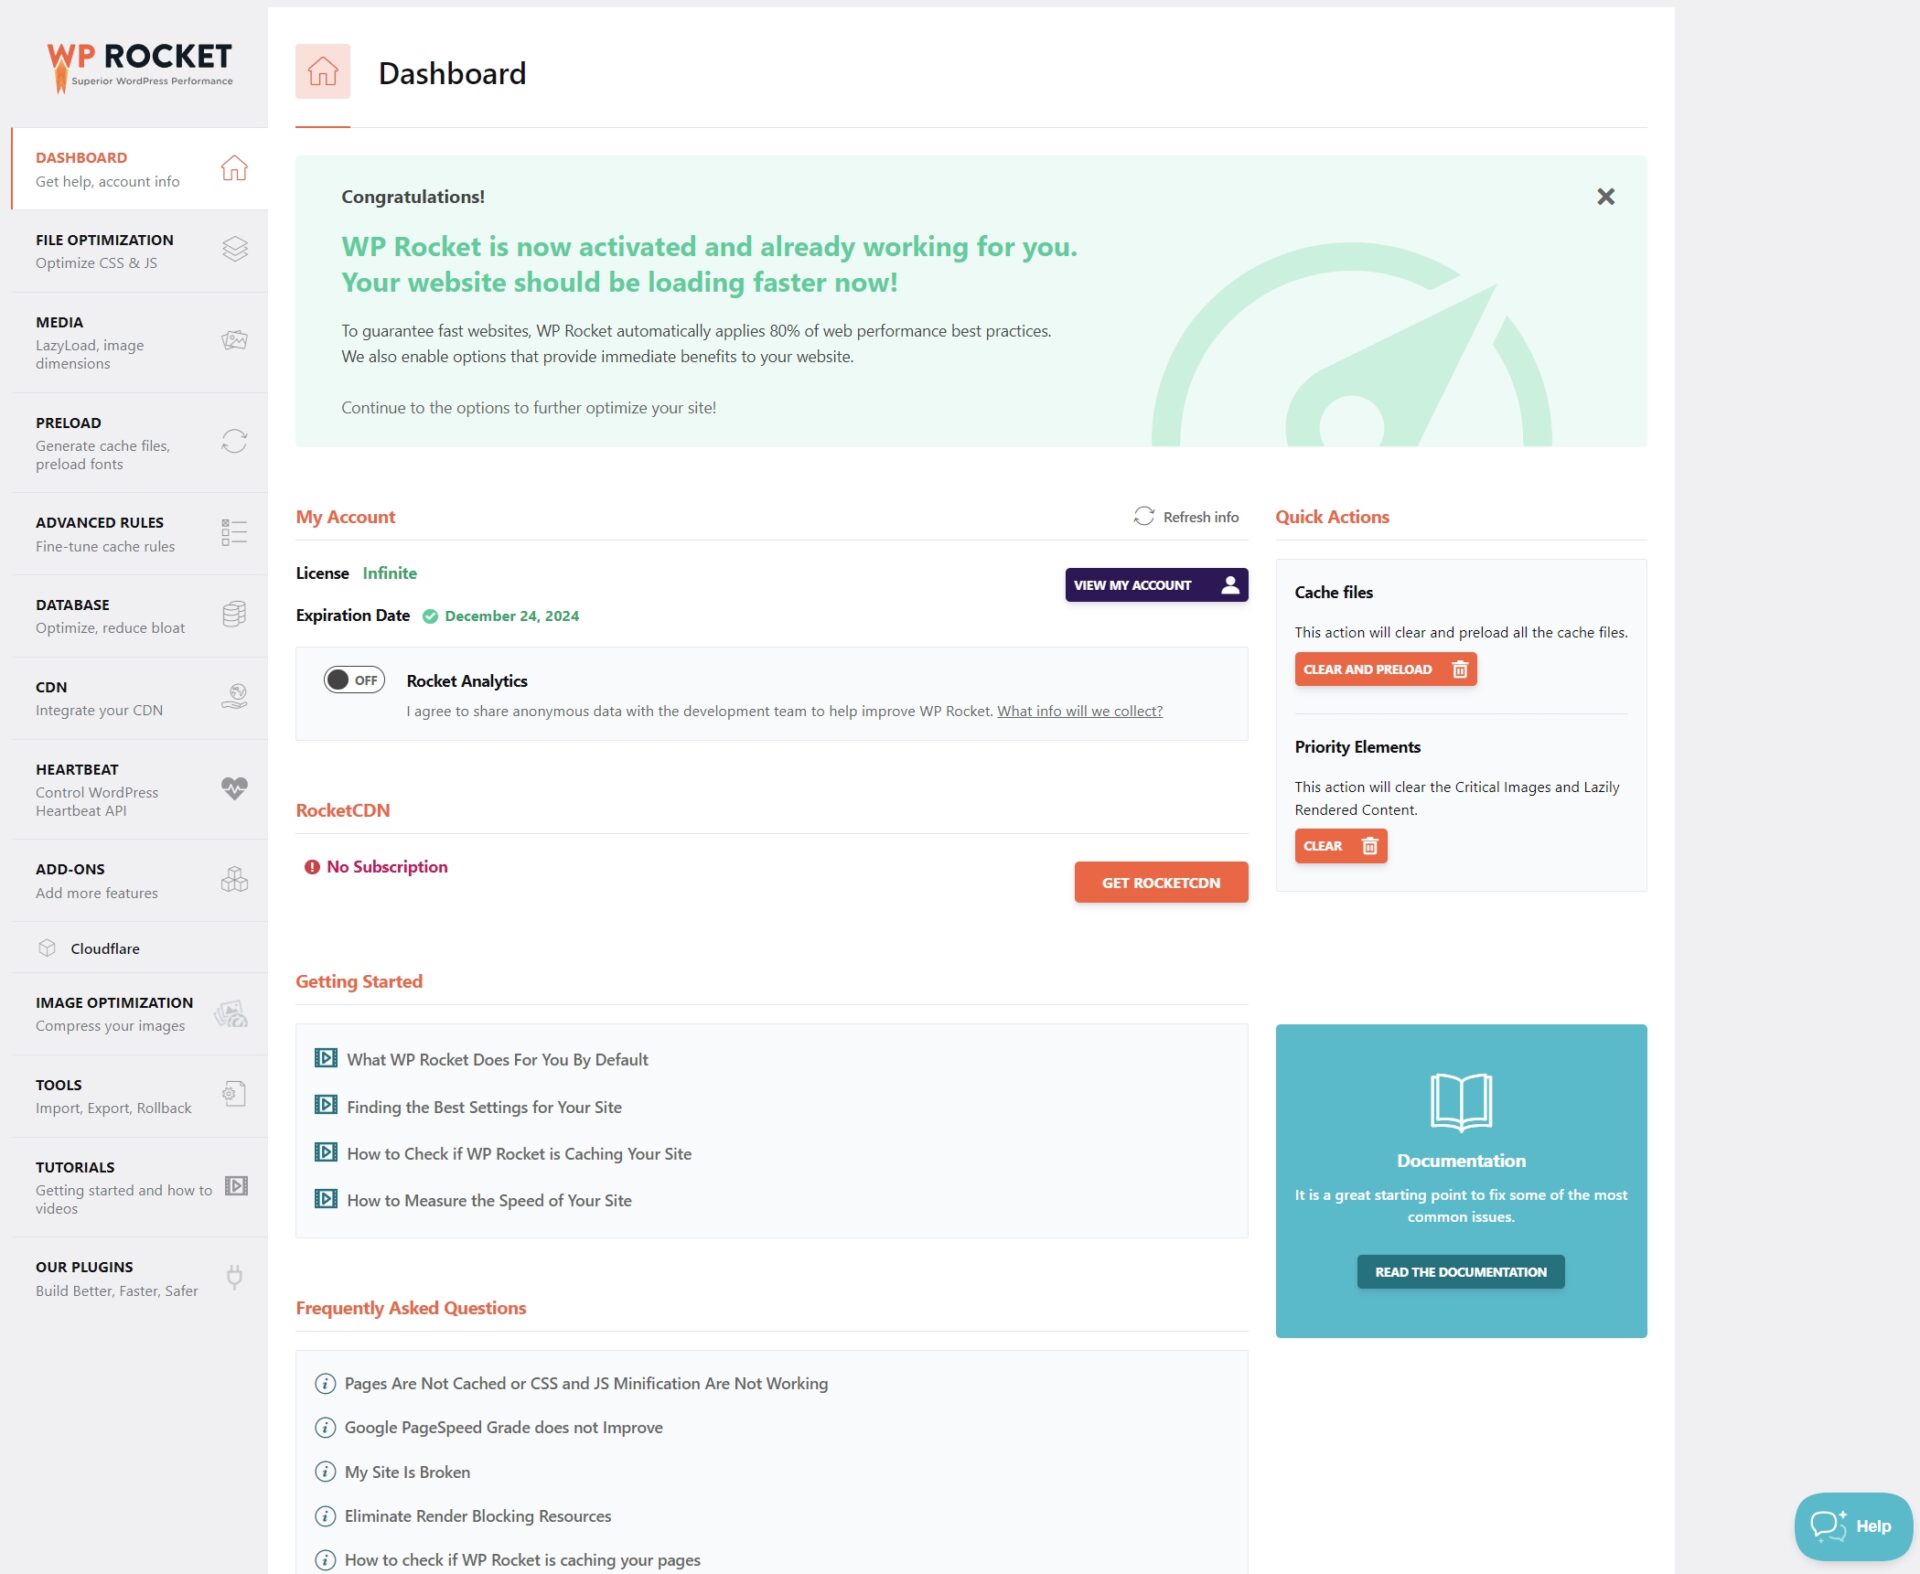
The WP Rocket dashboard is the control center for your website’s performance optimization, designed to make speed enhancements straightforward and efficient. As soon as the plugin is activated, it implements 80% of web performance best practices automatically, delivering immediate results without requiring advanced technical know-how, but the guide outlined in this WP Rocket review sure helps.
Key Features of the Dashboard:
License and Updates: Manage your license and check for updates directly from the dashboard, ensuring your site always benefits from the latest performance enhancements.
Quick Actions:
- Clear Cache: Allows you to delete all cached files and regenerate them, ensuring that your website always serves fresh content.
- Preload Cache: Automatically generates cached versions of your pages, speeding up the delivery to visitors.
- Priority Elements: Clears critical images and lazily rendered content to optimize visual performance.
- Guided Setup: The “Getting Started” section provides tutorials and FAQs, making it easier for beginners to fine-tune their settings. For professionals, it’s a handy reference for troubleshooting.
- Advanced Settings: With options for file optimization, database cleaning, CDN integration, and more, the dashboard centralizes all critical optimization tools in one accessible interface. More one that a bit later in this WP Rocket review.
The WP Rocket dashboard makes it clear that optimization doesn’t have to be a complicated process.
1.1 File Optimization: Streamlining CSS and JavaScript for Peak Performance
Now we are getting to the good stuff of the WP Rocket review. In this section you can improve your website speed the most.
Also, you can break its functionality.
That makes properly setting and testing this features as the most important part of speed optimization. And most times consuming as well.
The File Optimization section in WP Rocket is a powerhouse for reducing page load times by optimizing CSS and JavaScript files as I’ll show next on this WP Rocket review. This feature minimizes file sizes, eliminates render-blocking resources, and ensures your site delivers a smoother user experience.
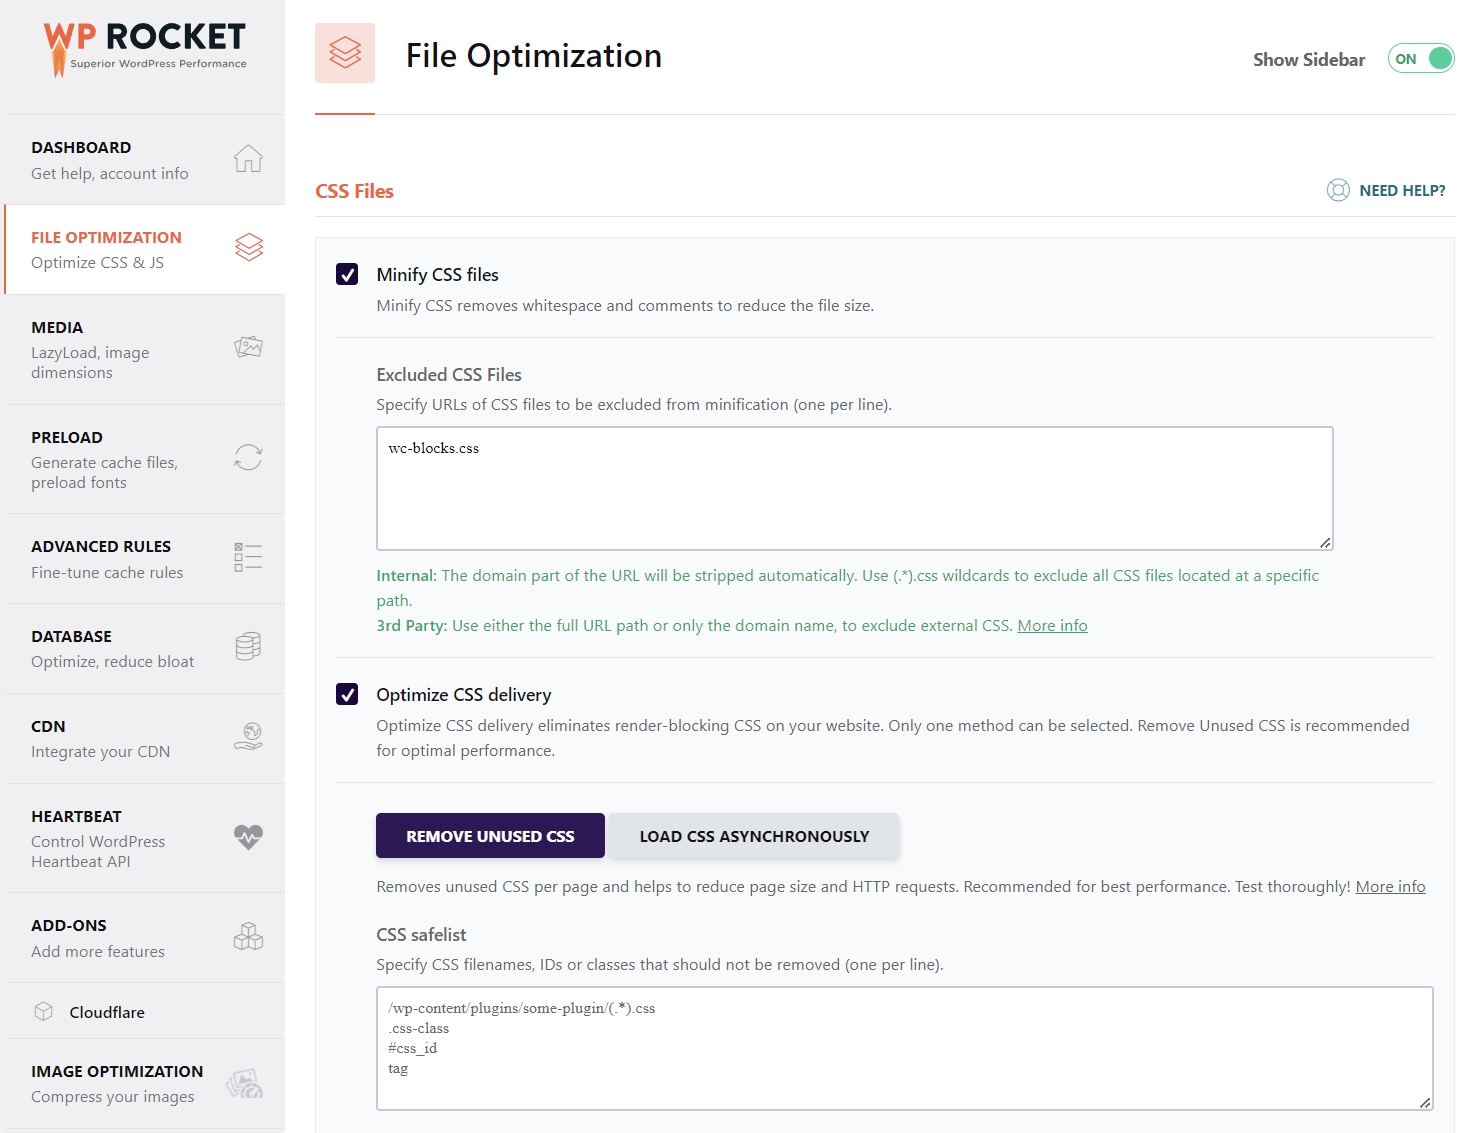
WP Rocket review — Key Features of CSS File Optimization:
1. CSS Minification:
WP Rocket removes unnecessary whitespace and comments from CSS files, reducing their size and making them load faster.
You can exclude specific CSS files from minification to avoid compatibility issues by adding their paths to the exclusion list.
2. Optimize CSS Delivery:
This option eliminates render-blocking CSS, which can delay the display of visible content.
WP Rocket offers two methods:
- Remove Unused CSS: Automatically detects and removes CSS that isn’t being used, significantly reducing file size. Use this one for best results.
- Load CSS Asynchronously: Ensures that essential content loads first while loading non-critical CSS in the background.
3. CSS Safelist:
A handy tool to protect essential CSS files, classes, or IDs from being removed or deferred, ensuring that key design elements remain intact.
You’ll need to work on your exclusion list, and test your website for any weird styling until you get it right.
Keeping your CSS in check, preloaded if needed early, and otherwise loaded later is important for increasing your website speed. WP Rocket makes this easy to handle. If you’d like to master it, you’ll need to dive deeper into your website, browser console errors, and network tab and test everything a zillion times.
1.2 File Optimization part 2: JavaScript Optimization
The JavaScript Files section in WP Rocket is the most critical part for optimizing how JavaScript is handled on your website and usually the website speed in general.
Poorly optimized JavaScript can significantly slow page loading, especially on mobile devices.
WP Rocket provides several features to streamline and defer JavaScript execution, ensuring that only the necessary scripts are loaded immediately.
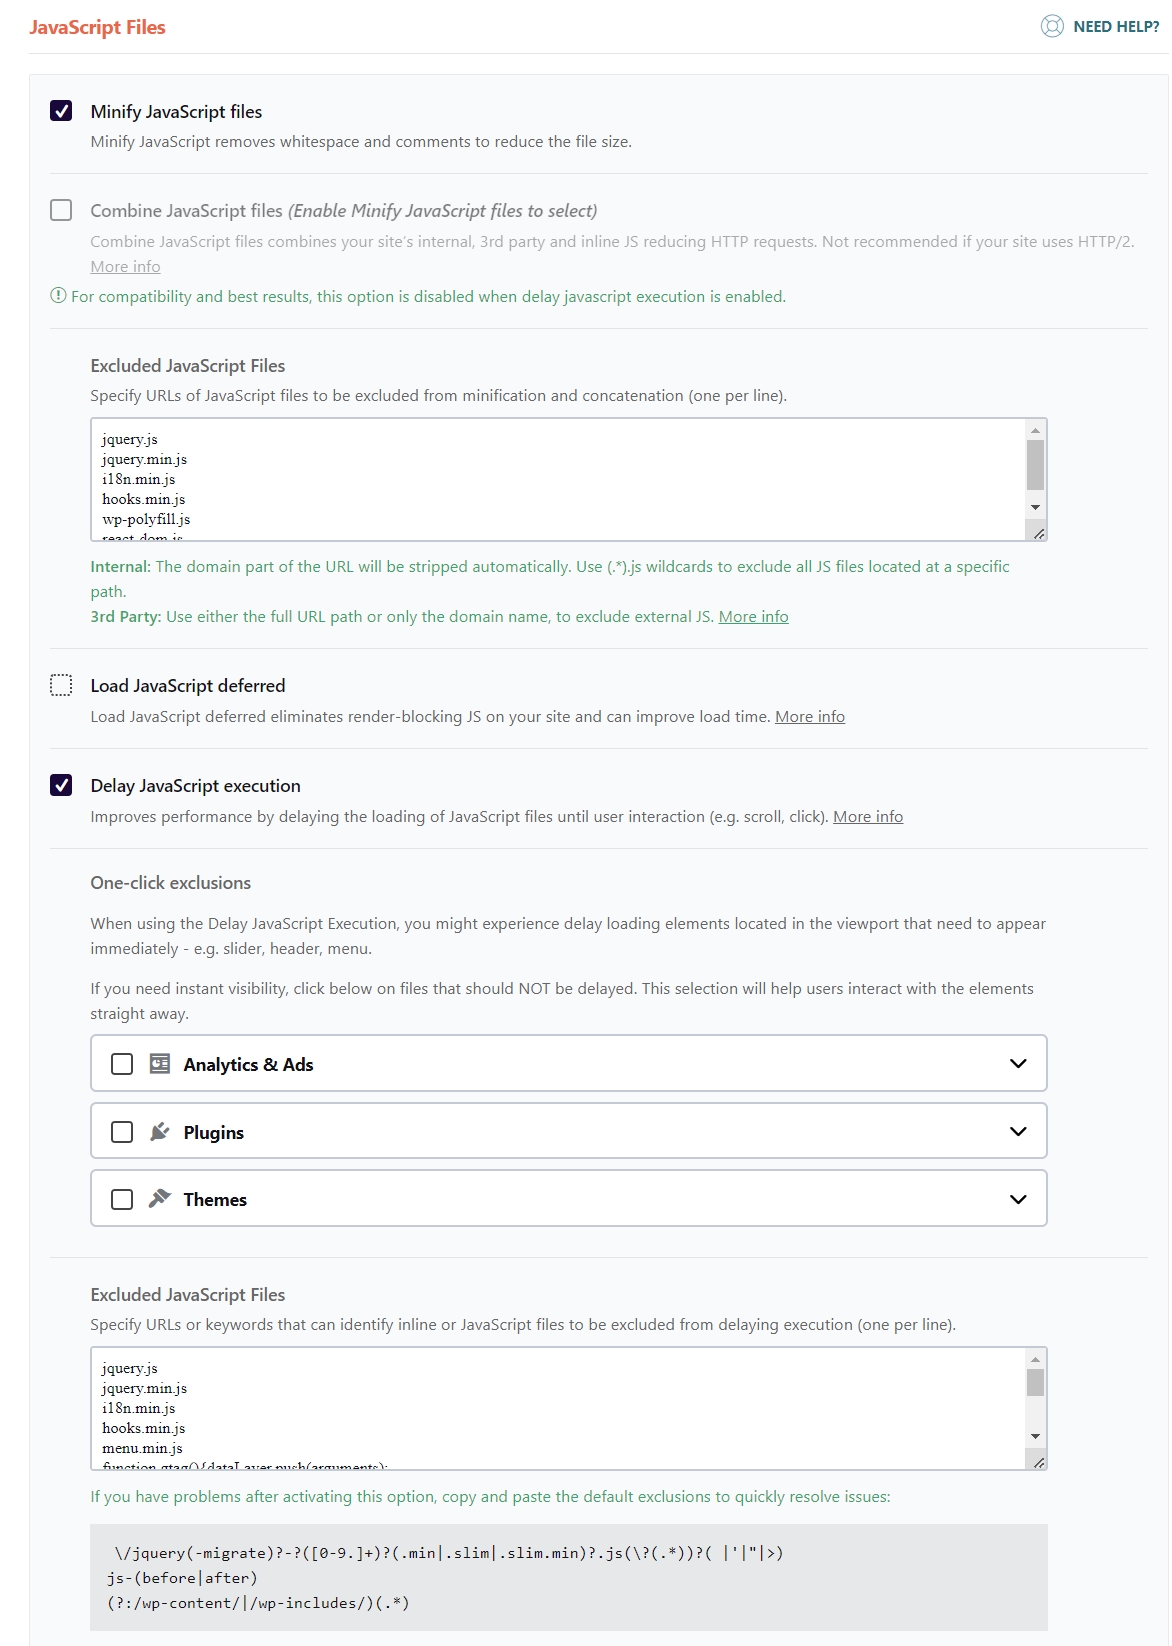
WP Rocket review — Key Features of JavaScript Optimization:
1. Minify JavaScript Files:
This feature removes unnecessary whitespace and comments from JavaScript files, reducing file sizes for faster downloads.
You can exclude specific scripts from minification by listing their file paths in the Excluded JavaScript Files section. As you can see in my example, I was forced to use this function to keep the website fully functional.
2. Combine JavaScript Files:
Combines multiple JavaScript files into a single file, reducing HTTP requests. However, this is disabled by default for sites using HTTP/2, as multiple smaller requests are often faster with this protocol. You can skip it.
3. Load JavaScript Deferred:
Defer JavaScript loading ensures that scripts are loaded only after the main content is visible, preventing render-blocking and improving user-perceived performance. While this function is usually welcomed, in our case, it was not needed.
4. Delay JavaScript Execution:
I have this headline in bold for a reason in this WP Rocket review. In most speed optimization projects, this one is the most important. If done correctly, it can improve your website speed by a large margin. However, if done improperly, it can break a lot of functionality. As .js files are exactly that — functionality.
One of WP Rocket’s standout features, this delays the execution of non-critical JavaScript files until the user interacts with the page (e.g., scrolling or clicking). This dramatically improves performance metrics like First Contentful Paint (FCP) and Speed Index.
One-Click Exclusions: Allows you to exclude important scripts, such as those related to analytics, plugins, or themes, from being delayed. This ensures key functionalities are not affected. Or you may skip it and do it manually in the Excluded js files section as I did.
5. Advanced Exclusions:
This is another very important part of the WP Rocket review if you have previous settings on and you’d like your website to continue working as intended. Like we all should.
You can add custom patterns or file paths for JavaScript files to exclude them from optimization entirely. This ensures compatibility with complex site elements or third-party scripts.
If you are advanced user you’ll want to explore this function.
Optimizing CSS and JavaScript files can significantly reduce page load times and enhance user experience. By delaying non-critical scripts and minifying the rest, WP Rocket ensures your website runs smoothly, even on slower connections or less powerful devices.
These features are particularly valuable for meeting Core Web Vitals benchmarks, improving both user engagement and SEO performance.
2. Media Optimization: Lazy Loading and Image Enhancements in WP Rocket
The Media section in WP Rocket is designed to enhance how images, videos, and other media elements are loaded on your website.
By optimizing media, WP Rocket significantly improves both page load times and user experience without sacrificing content quality.
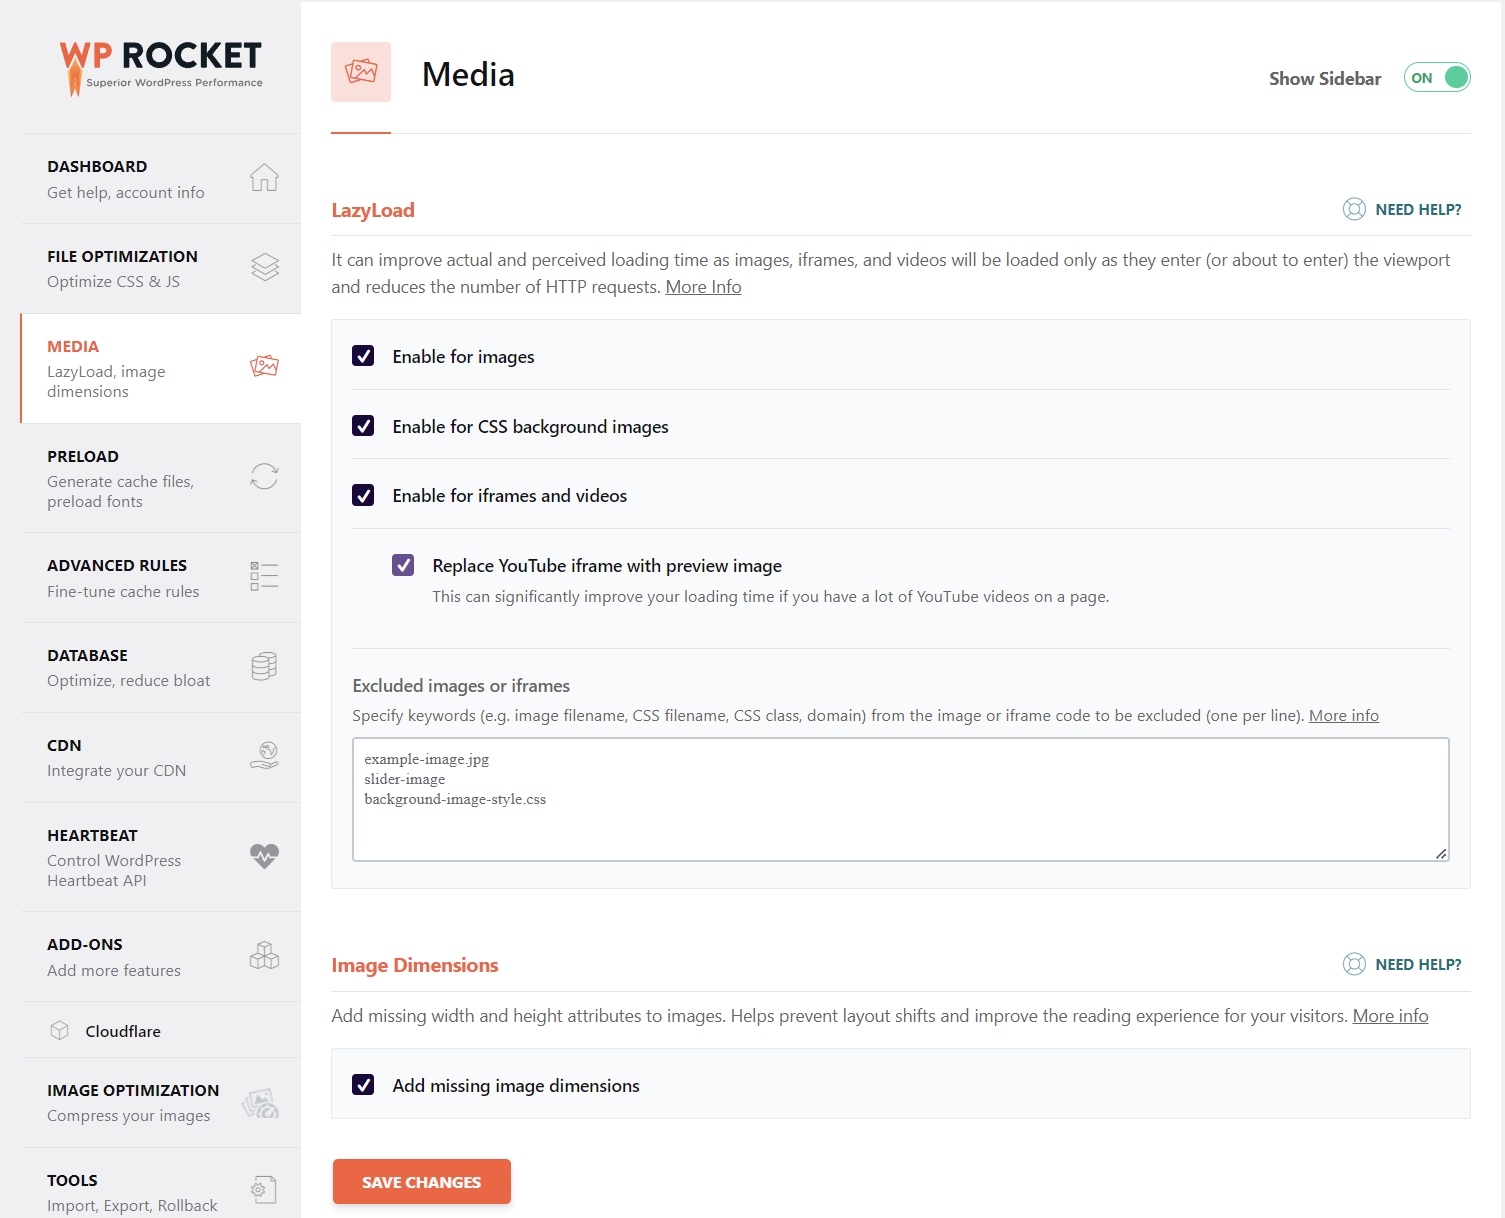
In my case, lazy loading was active in another plugin, so I’ve activated it here only to show you the functionality. For that reason, there are no excluded image files in this WP Rocket review—you’ll certainly have a few.
WP Rocket review—Key Features of Media Optimization:
- Images: Lazy loading ensures images are loaded only when they come into view (or are about to), reducing initial page load times and server resource usage.
- CSS Background Images: Similar to regular images, CSS-based background images can also be lazy-loaded for further optimization.
- Iframes and Videos: Videos embedded via iframes (e.g., YouTube) are only loaded when users scroll to them, minimizing the impact on loading performance.
- Replace YouTube Iframes with Preview Images: This feature replaces heavy iframe embeds with lightweight preview thumbnails, loading the actual video only when the user interacts with it. This is especially effective for pages with multiple videos.
- Exclude Specific Media from Lazy Loading: You can exclude critical images or iframes (e.g., sliders, logos, or hero images) to ensure they load immediately for a seamless user experience. This is easily managed by specifying filenames, CSS classes, or domains.
- Add Missing Image Dimensions: WP Rocket adds width and height attributes to images that lack them. This prevents layout shifts during page loading, contributing to a better Cumulative Layout Shift (CLS) score in Core Web Vitals.
Why Media Optimization Matters:
In this WP Rocket review I’ll mentione that media files are often the largest contributors to slow page loads. By lazy-loading and fine-tuning how images and videos are served, WP Rocket reduces the strain on bandwidth and improves performance metrics like Speed Index and First Input Delay (FID).
This results in faster, smoother experiences for users.
3. Preload in WP Rocket: Accelerating Content Delivery for Improved Performance
The Preload section in WP Rocket is designed to ensure that critical resources are ready and waiting before users even interact with your website.
By preloading cache, links, DNS requests, and fonts, WP Rocket optimizes how content is delivered, drastically improving perceived load times and user experience.
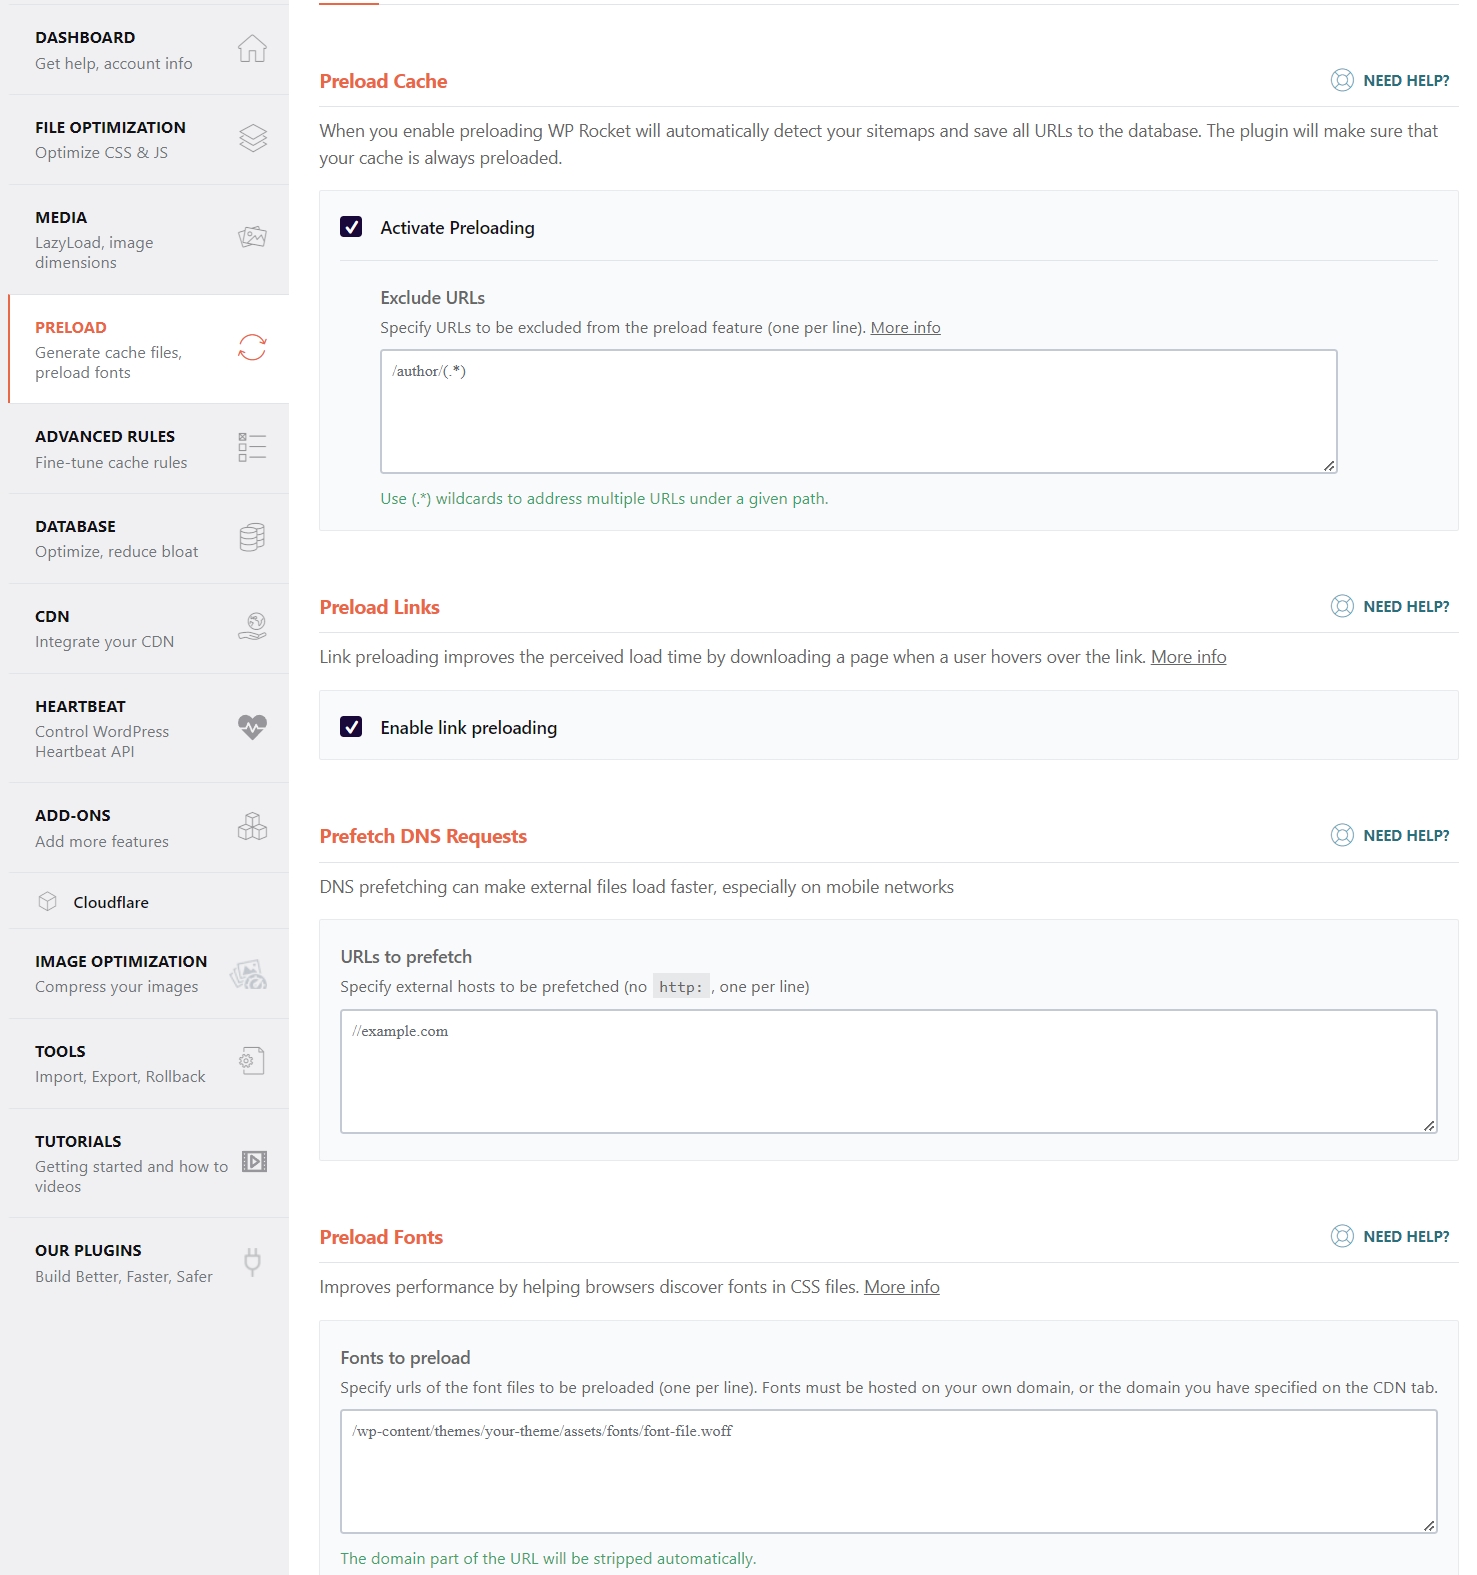
WP Rocket review—Key Features of Preloading:
1. Preload Cache:
When activated, WP Rocket automatically detects your XML sitemaps and preloads the cache for all URLs listed.
This ensures that visitors always receive a cached version of your pages, speeding up their experience.
Exclude URLs: Specific URLs can be excluded from the preloading process, allowing you to control what content is cached.
2. Preload Links:
Link preloading works by downloading the destination page as soon as a user hovers over a link. This feature is especially effective for reducing the perceived load time when users navigate between pages.
3. Prefetch DNS Requests:
DNS prefetching resolves external domains before a browser makes a request, reducing the latency for assets like scripts, images, or stylesheets hosted on external servers.
You can specify external domains in the “URLs to prefetch” field to optimize this process further.
4. Preload Fonts:
Fonts hosted locally or on a specified CDN can be preloaded to ensure they are available as soon as they are needed.
This reduces rendering delays and improves metrics like Largest Contentful Paint (LCP).
Why Preloading Matters:
Preloading ensures that critical resources are available before they’re required, minimizing delays and enhancing user experience.
These optimizations are especially beneficial for improving Core Web Vitals and achieving higher PageSpeed scores.
4. Advanced Rules: Fine-Tuning Cache Behavior for Precision Control
The Advanced Rules section in WP Rocket provides granular control over how caching is applied to your website. This feature is ideal for tailoring the caching process to meet specific requirements, such as excluding sensitive content or ensuring compatibility with unique site configurations. That’s why I included it in the WP Rocket review.
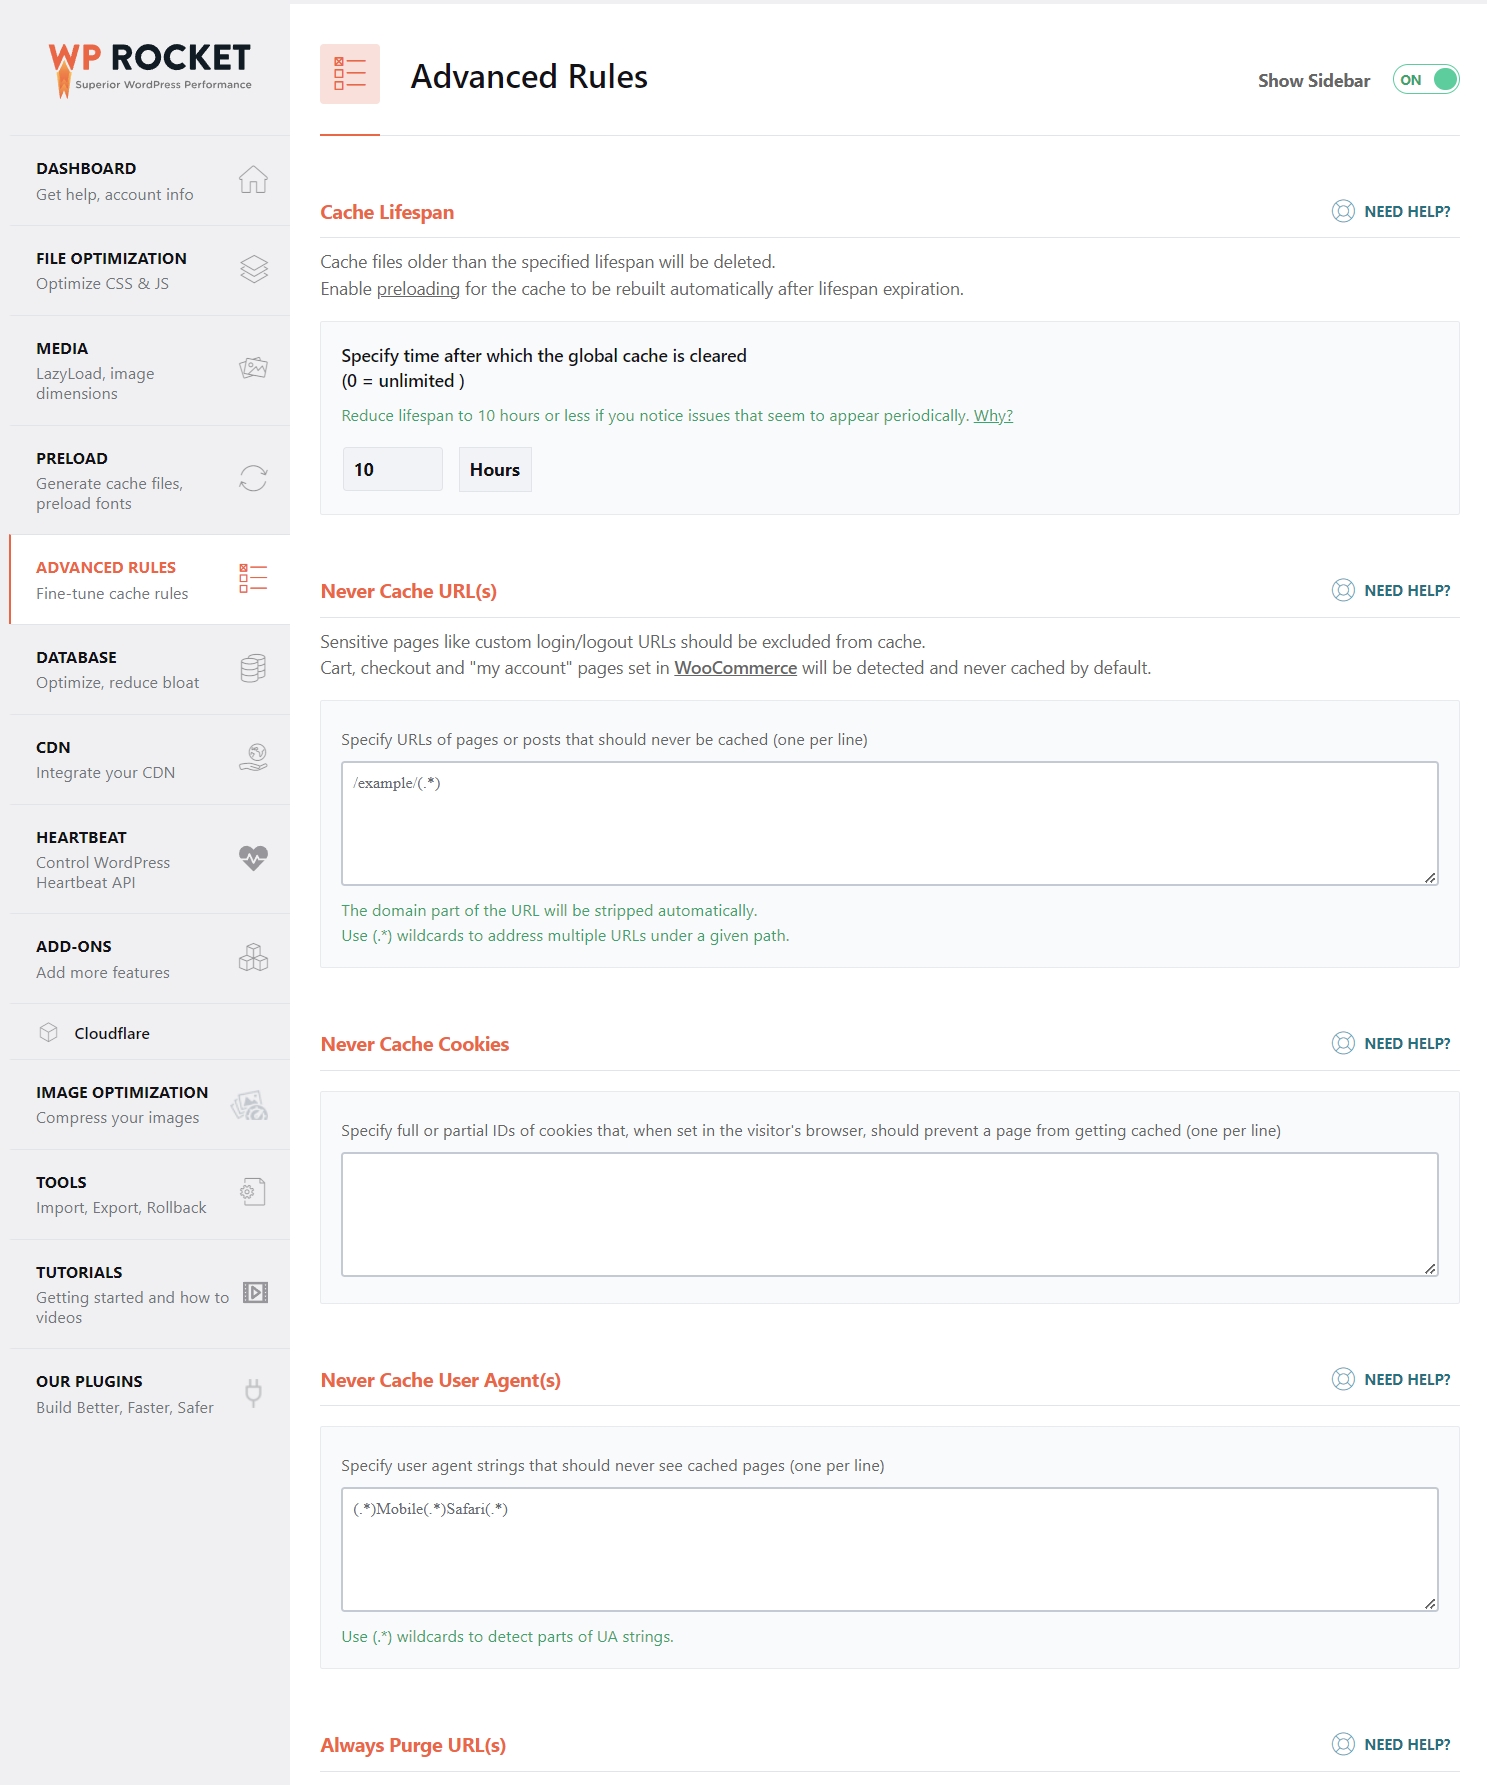
WP Rocket review—Key Features of Advanced Rules:
1. Cache Lifespan:
Define how long cached files are stored before being deleted and rebuilt. A shorter lifespan can ensure fresh content is served, while a longer one reduces server load.
Example: Setting the cache lifespan to 10 hours ensures periodic updates while maintaining performance stability.
2. Never Cache URLs:
Prevent caching for specific URLs, such as login pages, checkout pages, or other dynamic content that changes frequently.
For example:
- Login/logout pages:
/example-login/* - Custom user profiles or dashboards.
3. Never Cache Cookies:
Specify cookies that, when detected, prevent a page from being cached. This is useful for dynamic content that depends on specific user sessions or preferences.
Example: Pages displaying cart details for logged-in users.
4. Cache Lifespan:
Exclude caching for specific user agents, such as mobile browsers or bots.
For instance:
- Mobile-specific configurations:
(*Mobile*|*Safari*) - Useful for ensuring consistent behavior across devices or catering to crawlers.
5. Always Purge URL(s):
Automatically purge specific URLs from the cache whenever content updates occur. This ensures that frequently updated pages always display the latest version to visitors.
Why Advanced Rules Are Important:
Advanced Rules give you full control over how and when caching is applied. This flexibility is essential for handling dynamic content, maintaining compatibility with various user agents, and delivering a personalized experience for logged-in users.
It ensures that WP Rocket’s caching works harmoniously with your website’s unique requirements.
Another vital part — checked in this WP Rocket review.
5. Database Optimization: Reducing Bloat for Faster Performance
The Database section in WP Rocket allows you to clean up unnecessary data and optimize your database for better performance. A bloated database can slow down your website, and regular maintenance ensures your site remains fast and efficient.
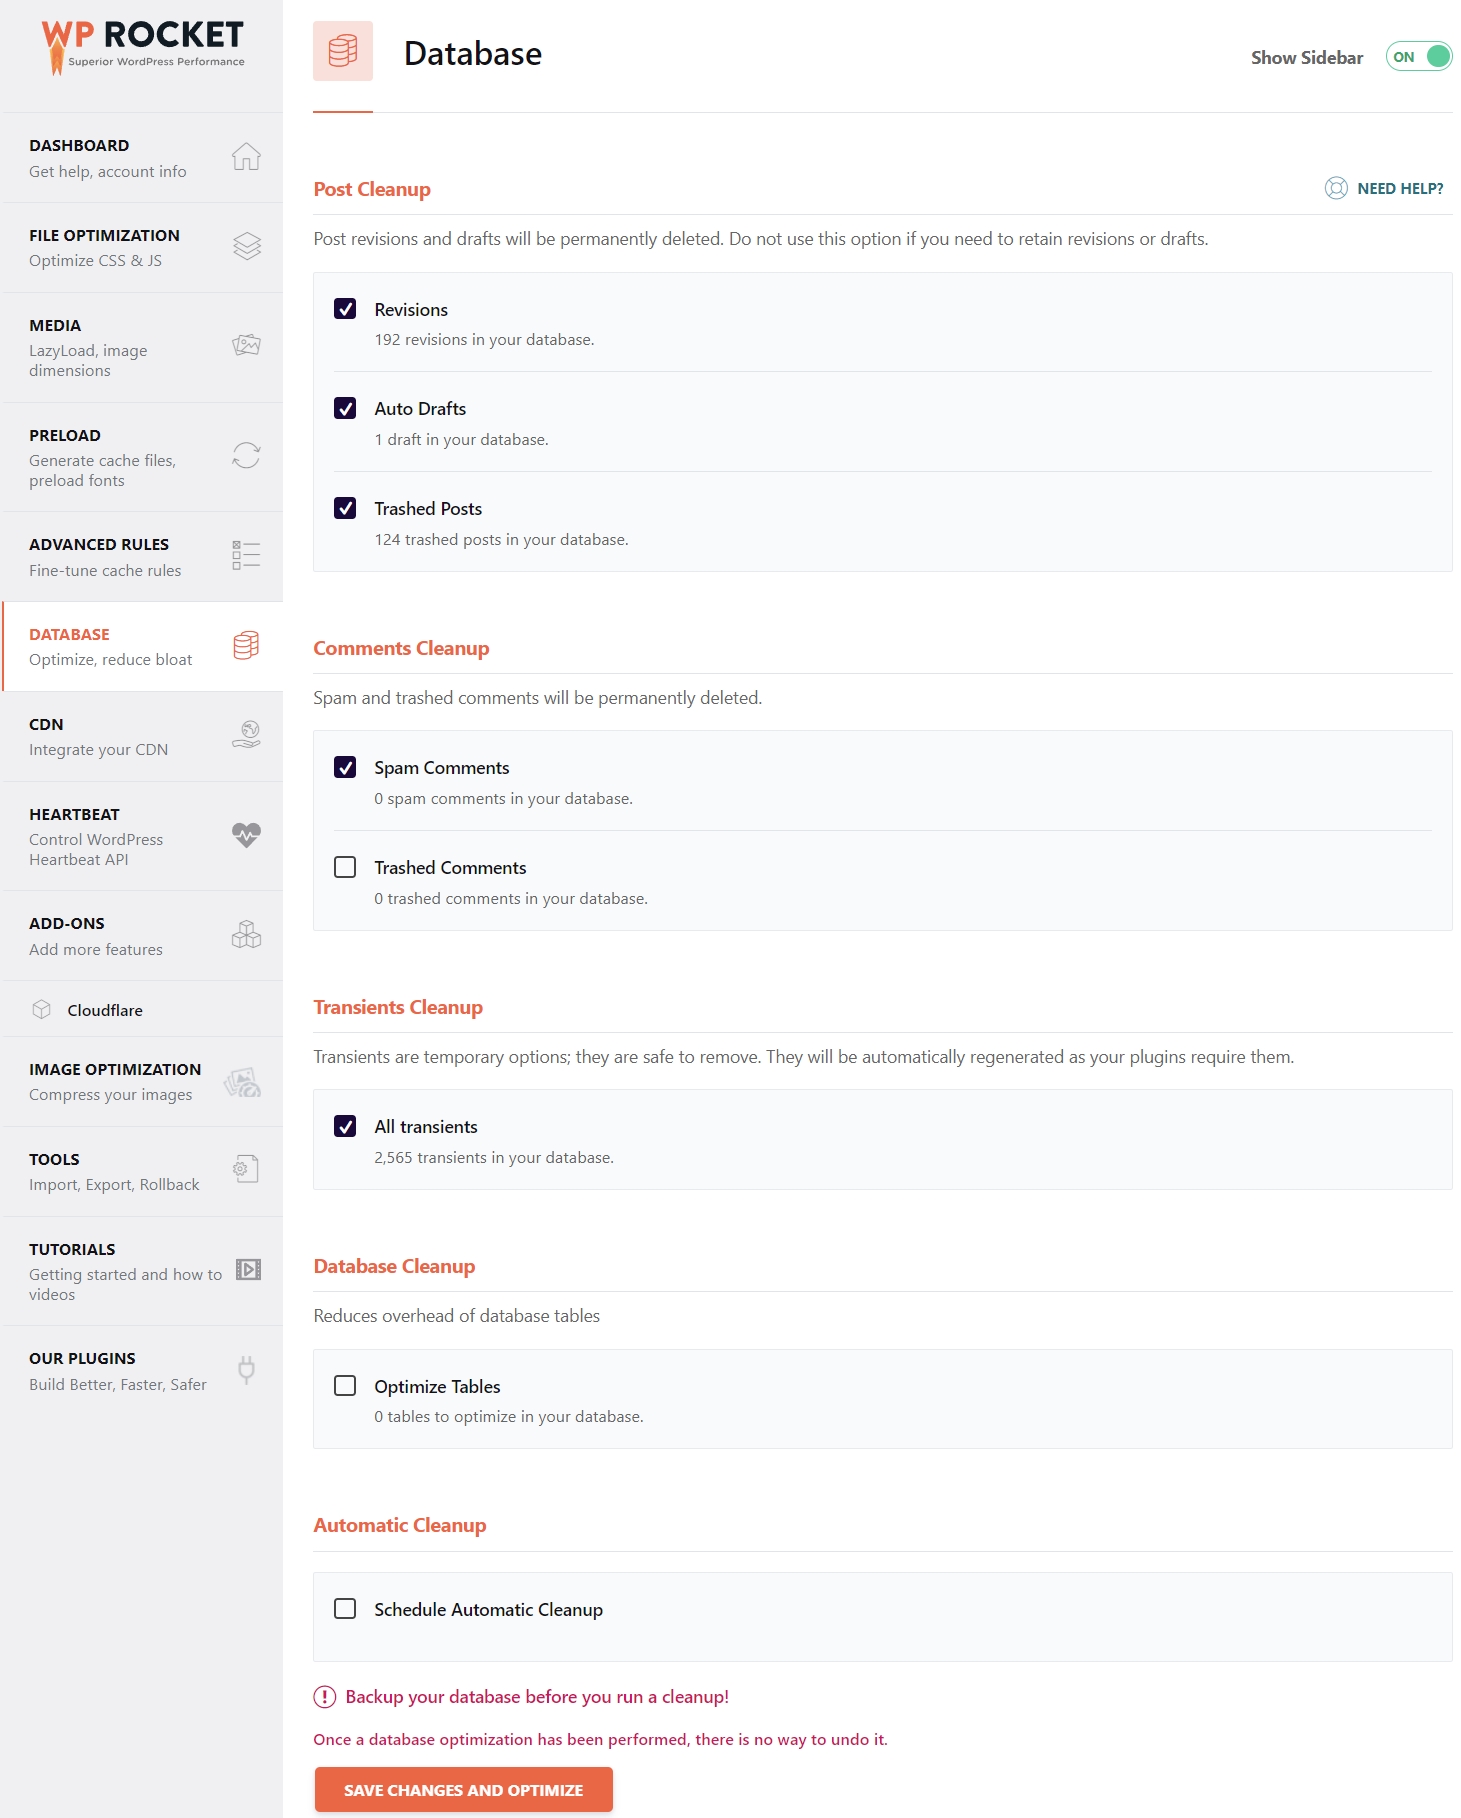
WP Rocket review—Key Features of Database Optimization:
1. Post Cleanup:
- Revisions: Removes old versions of posts and pages saved during editing. This reduces unnecessary database entries without affecting current content.
- Auto Drafts: Deletes automatically saved drafts that are no longer needed.
- Trashed Posts: Permanently removes deleted posts that still occupy space in the database.
2. Comments Cleanup:
- Spam Comments: Clears spam comments that are stored in the database, freeing up space.
- Trashed Comments: Permanently deletes comments that were sent to the trash.
3. Transients Cleanup:
Deletes expired or unnecessary transients, which are temporary data stored by plugins or themes. These are safe to remove as they can regenerate automatically if required.
4. Database Cleanup:
Optimizes database tables to reduce overhead and improve query performance. This process compacts the tables, making data retrieval faster and more efficient.
5. Automatic Cleanup:
You can schedule regular database cleanups to maintain a lean database without manual intervention. This ensures consistent performance improvements over time.
Important Note:
Before running a database cleanup, always back up your database. Database optimizations are irreversible, so having a backup ensures you can restore your data if needed.
Why Database Optimization Matters:
A clean and optimized database reduces the time it takes for servers to retrieve data, resulting in faster page loads and smoother performance.
Regular maintenance through WP Rocket ensures your site remains responsive, even as your content grows.
6. Cloudflare Integration: Enhancing Caching and Security
The Cloudflare section in WP Rocket provides seamless integration with the popular CDN and security service.
By connecting WP Rocket to your Cloudflare account, you can optimize caching and content delivery while maintaining top-notch security for your website.
On some web hosts offer CDN of their own (usually through CDN), and you don’t have to use this WP Rocket feature. But for those who have external Cloudflare CDN as I do, it’s a welcomed feature. You can clear all Cloudflare cache from the WP Rocket.
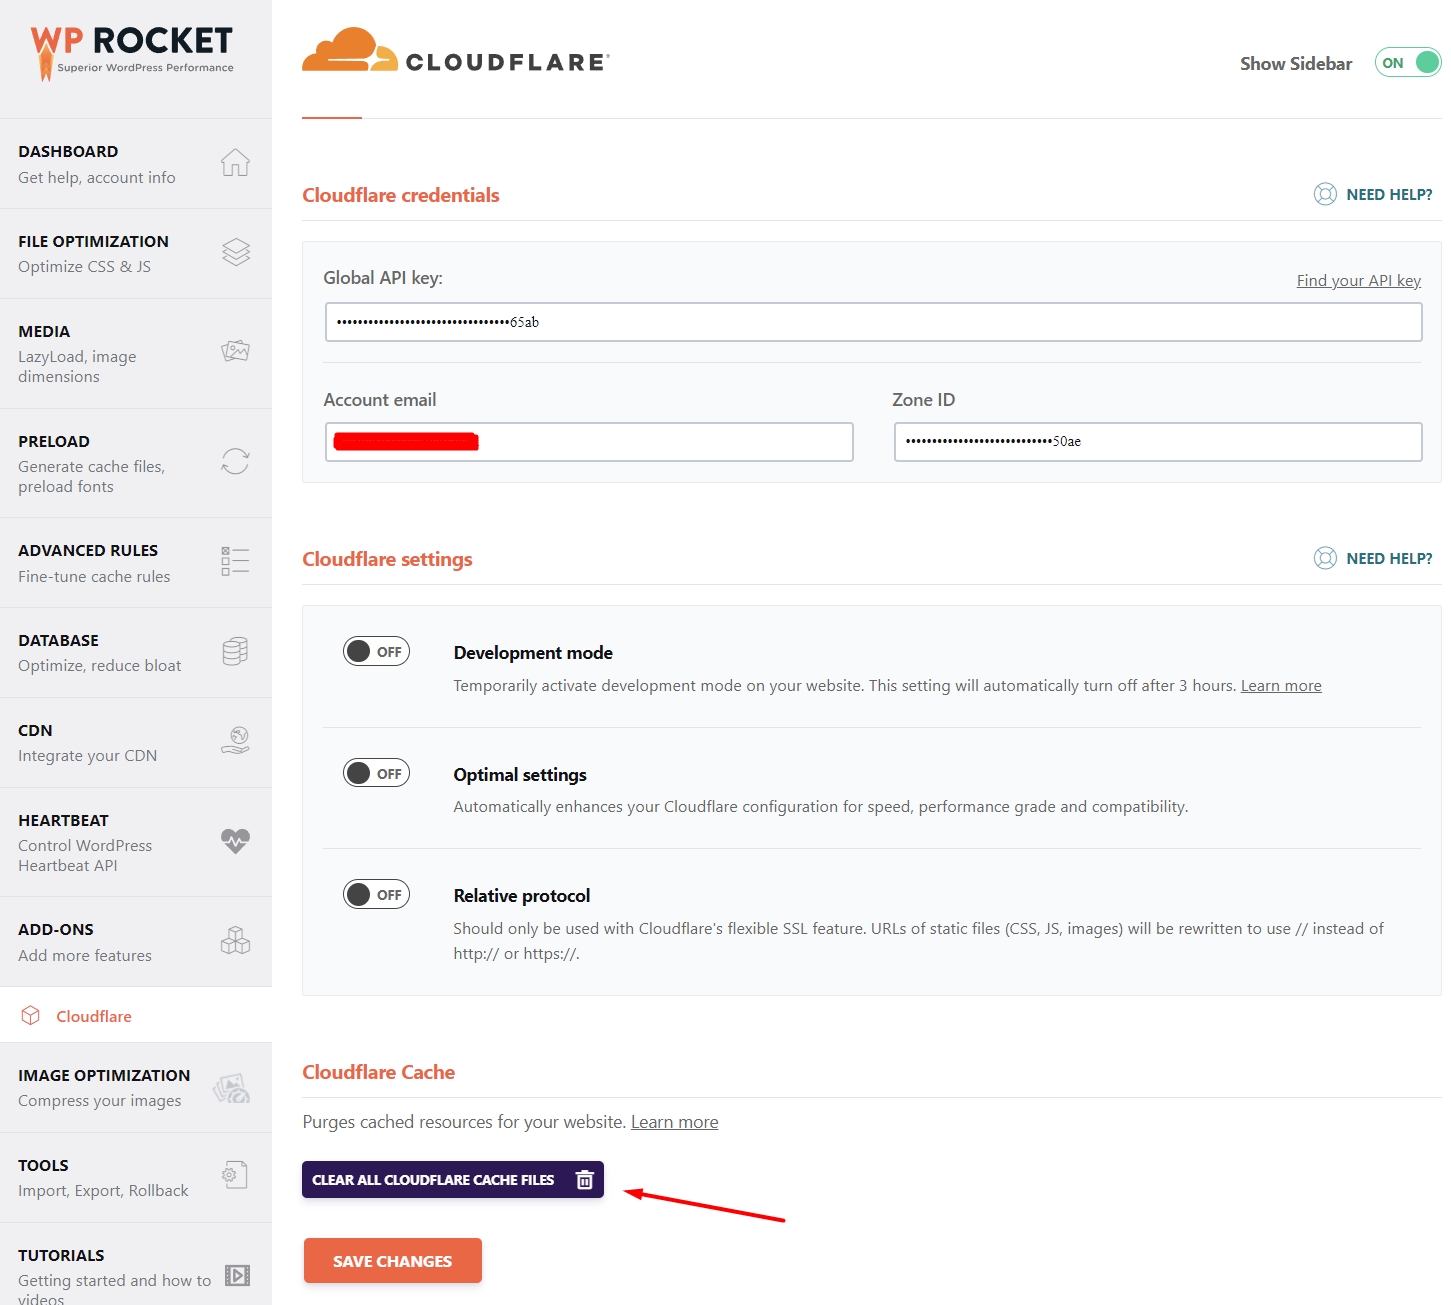
WP Rocket review—Key Features of Cloudflare Integration:
1. Cloudflare Credentials:
Enter your Global API Key, Account Email, and Zone ID to link WP Rocket with your Cloudflare account. You can find these information on your Cloudflare dashboard under Overview/API section.
This connection enables WP Rocket to manage caching and optimization settings directly within the plugin.
2. Cloudflare Settings:
- Development Mode: Temporarily disables Cloudflare caching, allowing you to make changes to your website and preview them instantly. This mode automatically turns off after three hours.
- Optimal Settings: Applies recommended Cloudflare configurations for better speed, performance, and compatibility with WP Rocket. This feature simplifies the setup process for users unfamiliar with Cloudflare’s advanced options.
- Relative Protocol: Ensures compatibility with Cloudflare’s flexible SSL mode by rewriting URLs to use
//instead ofhttp://orhttps://.
3. Cloudflare Cache Management:
The Clear All Cloudflare Cache Files button lets you purge all cached files from Cloudflare’s servers, ensuring that visitors see the most up-to-date content.
Why Cloudflare Integration Matters:
Cloudflare’s global content delivery network (CDN) accelerates your website by serving cached content from servers closest to your visitors.
When paired with WP Rocket, this integration optimizes cache management, ensuring maximum speed and minimal downtime.
Additionally, Cloudflare’s security features add an extra layer of protection against attacks.
7. Heartbeat Control: Optimizing Server Resource Usage within WP Rocket
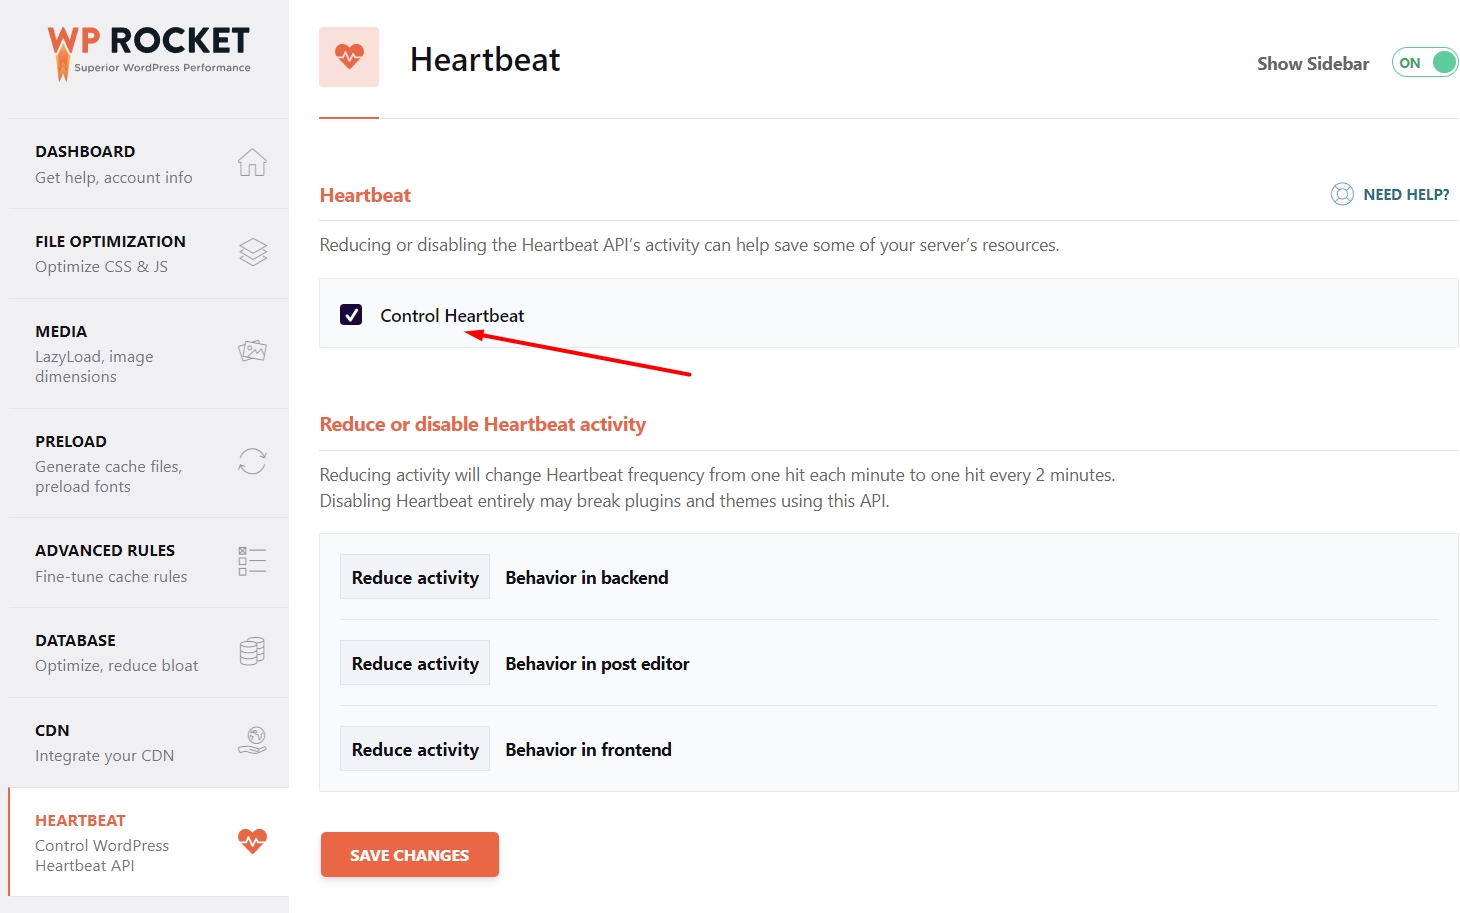
The Heartbeat section in WP Rocket is designed to manage the WordPress Heartbeat API, a core feature responsible for periodic server communication. While useful, the Heartbeat API can consume significant server resources, especially on high-traffic websites.
WP Rocket allows you to control or reduce this activity to optimize performance.
WP Rocket review—Key Features of Heartbeat Control:
1. Enable Heartbeat Control:
Activating this option allows you to manage and limit the Heartbeat API’s activity across your website.
2. Reduce or Disable Heartbeat Activity:
- Behavior in Backend: Reduces Heartbeat requests in the WordPress dashboard, particularly useful for sites with multiple administrators or contributors.
- Behavior in Post Editor: Manages auto-save functionality to prevent excessive server load during content creation.
- Behavior in Frontend: Limits Heartbeat activity on the website’s frontend, reducing unnecessary server requests.
WP Rocket modifies the Heartbeat frequency from the default one request per second to one every two minutes, significantly decreasing server strain.
Why Heartbeat Control Matters:
Uncontrolled Heartbeat activity can overburden your server, especially on shared hosting environments or websites with high traffic.
By reducing or controlling its activity, WP Rocket ensures that server resources are used efficiently, leading to better overall performance.
8. Add-ons: Extending WP Rocket’s Functionality for Specialized Needs
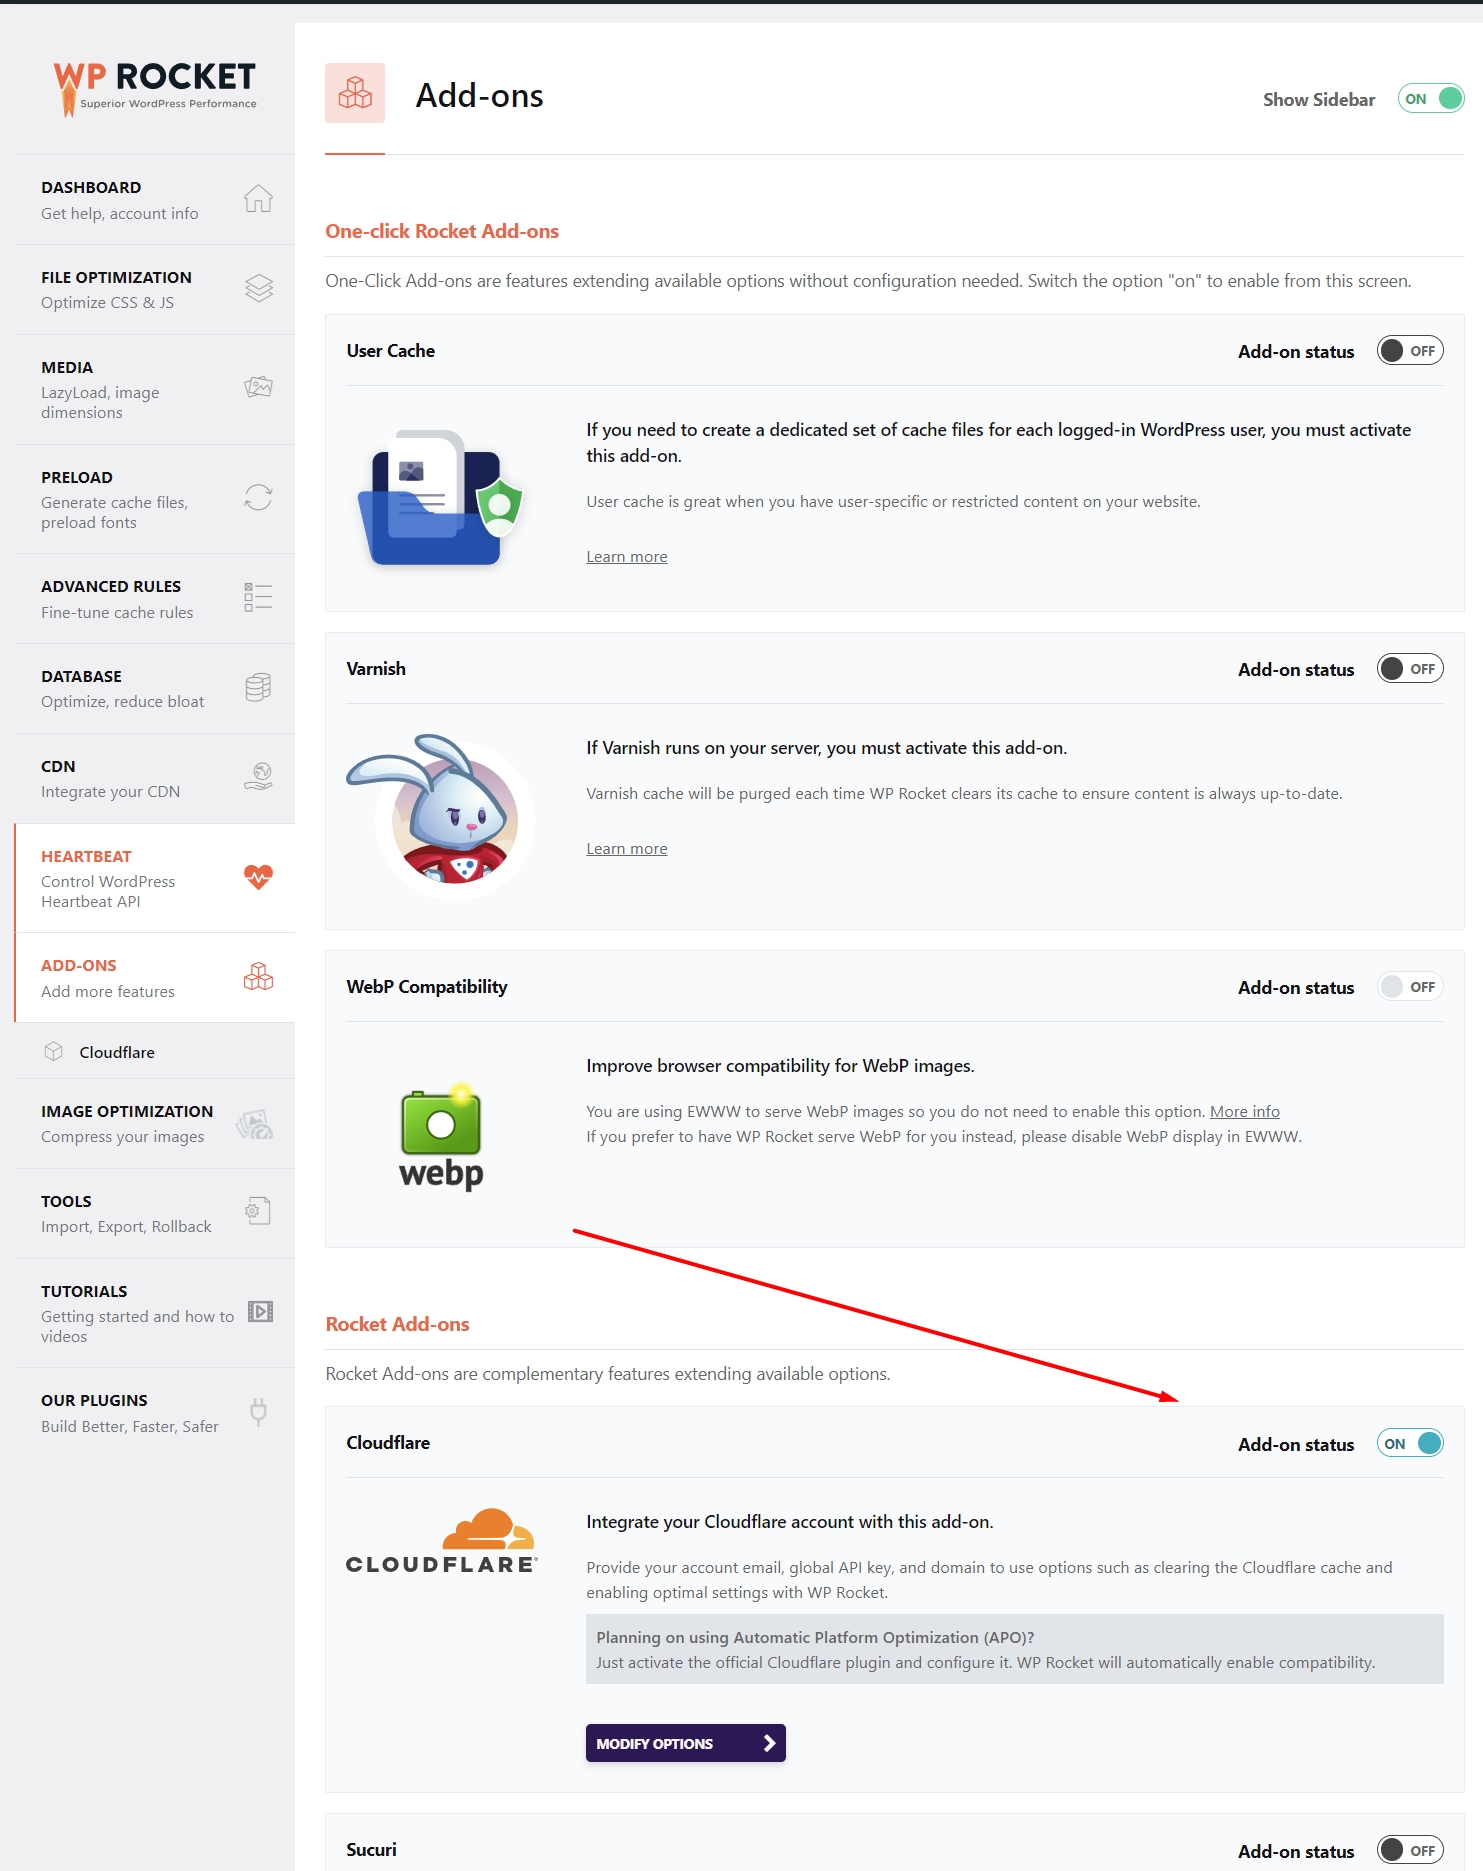
The Add-ons section in WP Rocket provides additional features that enhance compatibility and performance for specific use cases. These one-click add-ons are simple to enable and help tailor WP Rocket to your website’s unique requirements.
I’m using only the Cloudflare add-on, which I already shown here.
WP Rocket review—Key Add-ons Available:
1. User Cache:
Ideal for websites with logged-in users, such as membership sites, forums, or e-commerce platforms. This add-on creates a dedicated set of cache files for each logged-in user, ensuring personalized content is delivered without compromising performance.
2. Varnish Compatibility:
If your server uses Varnish caching, this add-on ensures WP Rocket clears the Varnish cache automatically whenever the WP Rocket cache is cleared. This keeps your content up-to-date across all caching layers.
3. WebP Compatibility:
For websites serving WebP images (a highly efficient image format), this add-on ensures full browser compatibility.
Note: If you’re already using another plugin like EWWW IO to serve WebP images, you won’t need to enable this add-on unless you prefer WP Rocket to handle WebP delivery.
4. Cloudflare Integration:
This add-on integrates your Cloudflare account with WP Rocket, allowing you to control Cloudflare-specific features, such as purging the Cloudflare cache and enabling recommended settings directly from WP Rocket.
With this add-on, you can optimize Cloudflare settings for performance and compatibility effortlessly.
5. Sucuri Integration:
If you use Sucuri as your security platform, this add-on clears the Sucuri cache automatically when WP Rocket’s cache is cleared.
This ensures your site’s cache is synchronized across all layers of caching and security.
Why Add-ons Are Useful:
These add-ons make WP Rocket adaptable to different hosting environments, user setups, and performance tools. By activating only the add-ons you need, you can enhance compatibility and boost performance without unnecessary configurations or complexity.
9. Tools: Simplifying Management and Troubleshooting
The Tools section in WP Rocket provides essential options for managing settings, resolving issues, and maintaining compatibility. This section makes it easy to save configurations, revert to a previous version, or update compatibility lists.

WP Rocket review—Key Features of the Tools Section:
1. Export Settings:
Download a backup of your current WP Rocket settings. This is especially useful when migrating settings to another site or safeguarding your configurations before making changes. I’ve used this one many times during speed optimization projects.
2. Import Settings:
Quickly upload a previously exported settings file to apply the same optimization configurations to another site. This ensures consistency across multiple websites with minimal effort.
3. Rollback:
If a new version of WP Rocket causes unexpected issues, you can revert to the previous major version with a single click. This ensures your site remains stable while troubleshooting.
4. Update Inclusion and Exclusion Lists:
WP Rocket maintains compatibility with various plugins, themes, and services. This feature updates these lists manually to ensure your site continues to work seamlessly with third-party integrations.
Why Tools Are Essential:
The Tools section acts as a safety net and a convenience feature, allowing you to manage WP Rocket effectively.
Conclusion: WP Rocket – Your Shortcut to a Faster Website
As you’ve seen at the beginning of this article/WP Rocket review (in the case study section), WP Rocket improved TTFB with the other speed metrics. One could argue that any page caching tool would do the same, and it would be only partially correct. WP Rocket uses a plethora of extremely important features for optimizing WordPress website speed.
Functions like Preloading of LCP Images (This feature automatically detects, prioritizes, and auto-optimizes critical images (images above the fold) by auto-excluding them from lazy loading). Or the Automatic Lazy Rendering (This automatic feature makes the browser render only the elements visible to users at that moment).
WP Rocket is the ultimate solution for anyone looking to optimize their WordPress website without diving into complex technical configurations. From improving PSI scores to reducing TTFB, its features like file optimization, lazy loading, database cleanup, preloading, and third-party integrations streamline every aspect of performance enhancement.
That makes WP Rocket stand out from the herd, and the only other plugin keeping up with it is FlyingPress. If you are interested in which one I found a winner, you can read this head-to-head comparison article.
TL;DR: Why WP Rocket?
- Performance Boost: Dramatically improves website speed and user experience.
- Easy to Use: No coding required, yet packed with advanced features for power users.
- Key Features:
- File optimization (CSS/JS minification, async loading).
- Lazy loading for media and iframe optimization.
- Database cleanup for reduced bloat.
- Preloading and link optimization for faster navigation.
- Integrations with Cloudflare, Sucuri, and WebP for seamless compatibility.
- Proven Results: Cuts TTFB, improves PSI scores, and optimizes Core Web Vitals.
In short, WP Rocket is a critical tool for anyone serious about website performance; its capabilities and constant evolution earned it this WP Rocket review. I can only suggest you try it and experience the speed transformation for yourself!
Feel free to reach out to us if you get stuck or if you’d like a professional to optimize your website speed. WordPress speed optimization service is our forte. Find out why we are top-ranked worldwide for it and why top WordPress plugin companies write about our speed optimization service.
Check out our speed optimization packages, improve your website performance, and join our satisfied clients list.
FAQ
What is WP Rocket?
WP Rocket is a premium WordPress caching and performance optimization plugin that helps improve website speed, enhance user experience, and boost search engine rankings by optimizing various aspects of your website’s performance.
How does WP Rocket improve website speed?
WP Rocket employs a plethora of features, including:
-Page caching
-Minification and concatenation of CSS and JavaScript files
-Lazy loading for images and videos
-Database optimization
-Preloading content for faster navigation
These features reduce load times, enhance Core Web Vitals, and improve overall website performance.
Do I need technical knowledge to use WP Rocket?
No! WP Rocket is designed to be beginner-friendly. Most features are enabled by default upon activation, and the dashboard provides clear instructions for additional optimizations.
However, advanced users can also customize settings for more granular control and better results.
Let us know if we can help you with it.
Will WP Rocket work with my hosting provider?
WP Rocket works with most hosting providers. However, if your host already provides server-side caching (e.g., WP Engine or SiteGround), WP Rocket complements these solutions with additional features like file optimization, lazy loading, and database cleanup.
Ensure that you don’t have duplicate features active at the same time.
Can I use WP Rocket with a Content Delivery Network (CDN)?
Absolutely! WP Rocket is compatible with CDNs, including Cloudflare. It offers integration features to manage CDN cache, apply optimal settings, and even rewrite URLs for assets hosted on a CDN.
Does WP Rocket clean up my database?
Yes, WP Rocket has a database optimization feature that removes unnecessary data like post revisions, trashed posts, spam comments, and expired transients, reducing bloat and improving query performance.
Disclaimer: This is NOT a paid article — no one paid me for it. However, this article may contain affiliate links that help WPservice.pro, and you may get a discount.

Founder of WPservice.pro
Dalibor is a master of web excellence. With a Bachelor of Science (BS) in civil engineering, Dalibor had an unusual road to end up in IT. Cultivating deep expertise in WordPress website speed optimization, meticulous maintenance, development, and search engine optimization (SEO) while preserving his engineering approach to problem-solving.
Having completed over 90 projects and achieved a top-rated status (on Upwork) in the highly competitive digital niche, Dalibor is a proper authority on enhancing performance and ensuring websites look exceptional and perform flawlessly.
Dalibor is a published writer and an avid learner who continually explores and embraces the latest digital trends. With a commitment to quality and a keen eye for detail, Dalibor is your trusted guide to achieving web success.


